How to Correctly Install Your Non-metallic Expansion Joint
 Non-metallic expansion joints, also known as rubber expansion joints, make up a large segment of the expansion joint used in the market today. When you are preparing to install a new expansion joint there are some precautions you need to take before you begin.
- Confirm system operating requirements
- Pressure rating / vacuum
- Temperature
- Vibration
- Movements
- Review anchors, supports, and alignment guides
- Confirm anchors and guides can support thrust and spring rates
- Add control units and compression sleeves if needed
- Examine expansion joint for gouges and cuts
- Remove all foreign material and debris
- Replace any components found to be defective
- Contact Kadant Unaflex with any concerns
 To begin the process of installation, position pipe flange faces assuring axes are aligned within 1/8 inch. If excessive force is required to achieve this alignment, use of an offset expansion joint may be necessary. A thin layer of a non-petroleum-based lubricant, such as soapy water, may be used to help slide the expansion joint into place. Maintain proper support of the expansion joint as it is carefully moved into position and bolt holes are aligned. Do not remove the support until the expansion joint is fully bolted into place.
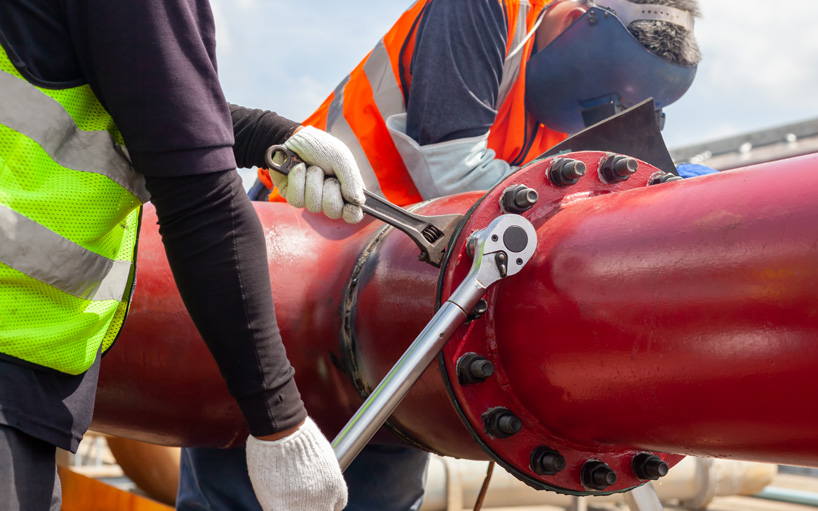
Once the rubber expansion joint is in position you can begin the installation of the bolts.
Step 1 – Insert bolts with washers through the retaining rings on the arched side of the expansion joint and then through the matting flange in a cross pattern.
Step 2 – Attach and hand tighten nuts with washers
Step 3 – Torque each bolt with the cross-bolt pattern until the outside edge bulges slightly
When control units are required, the gusset plates will be installed on the outboard side of the matting flange. The rods are inserted through the hole in the gusset place.
Torque requirements:
Tighten bolts in two to three successive steps in a cross-bolt pattern to the nominal torque in the table below. Periodically re-tighten the bolts after system start-up.
Full Faced Elastomer Flanges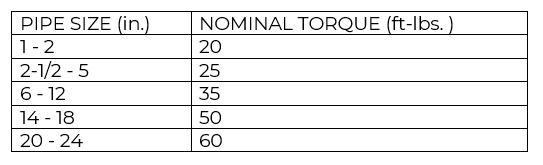
Joints with Beaded Ends Torque Requirements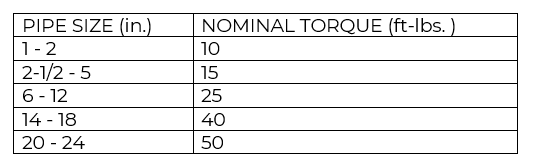
Periodically inspect your expansion joint to confirm satisfactory installation and operation. Re-tighten bolts periodically to ensure proper seal. When welding near expansion joint, cover with blanket or protective device to prevent damage. Prior to installation, store the expansion joint in a dry, dark, cool warehouse flange down on a level surface.
